TL;DR
VIPER architecture allows you to easily TDD your app, keep the code clean, share modules and distribute the work. It enhances a general development process by increasing frequency of sending the new functionalities to QA and Product Owner. It speeds up a multi-platform development as Android and iOS can share the general logic. It also makes you more agile allowing to change only specific parts of an app at any moment. For each screen, it introduces five or six modules, but don’t worry - there are tools to generate these for you. It has some entry threshold, but it can be overcame in a few days. There are plenty iOS articles and examples to learn from and a little bit of Android ones, but I will try to change this deficit in this blog, using Moviper - VIPER architecture library for Android.
Introduction
Every developer encounters in his path similar obstacles, while trying to advance from basics to advanced solutions. I think that today’s tutorials and blog posts aren’t very helpful in such cases, because they form two groups in general - very basic ones and very advanced ones, so obviously, there is a huge gap between these clusters. In my blog, I will try to fill the aforementioned gap on the example of a one specific architecture, which I think, makes the journey from primitive to the masters knowledge somehow easy and pleasant. In this post, I will try to convince you that VIPER architecture is worth trying. Let’s begin with reminding ourselves what caused most of the problems on our developer’s path.
Junior Dev Retrospection (Horror)
How to split?
Fellow mobile developer, at the very beginning, you probably implemented your first hello world app and then started to explore the depths of your platform. Very quickly you have realized that your Activities/View Controllers have grown to the enormous size, making you flea to the Google to find a remedy for that. Then you found it, the glorious MVP/MVC/MVVM/MV-something architecture that claimed it will resolve your problem for sure. So you grabbed your coffee, rushed to the keyboard and rewrote your app in the brand new, proper way.
After a few long hours, you laid back in rejoice for a moment and admired the great piece of software you have just crafted. But then you froze in horror. Your Activities/View Controllers are nice and slim right now, but wait, we have another god-classes, the Controller/Presenter/ViewModel ones! Oh noes, they are responsible for handling the routing through the app, data management, interacting with system framework and many other things! That nasty classes for sure do not fulfill the idea of the Single Responsibility Principle.
What shall I do now? Some senior developer looked at you with indulgence and advised warmly: Delegate your responsibilities from presenter. Do what? Delegate what? After a quick research you instantly caught up, but then you got stuck again. I still don’t know what I should delegate! How do I know if I should delegate every method, bunch of them or maybe I should just split the presenter in half? I’m just a junior developer, I don’t have such intuition!
How to test?
Let’s skip the latter part for now. Instead, think about that other situation, the situation in which you have found a bug in your app. You found it, so you fixed it. The problem is that when you have fixed it, the two new nasty regressions came up in your project. After fixing one of them, another two showed up to accompany the one that have left from the first wave. It was like fighting a hydra. Very quickly you found yourself banging your head against the wall trying to get a grip on the project again.
That sad scenario led you to discover testing and Test Driven Development. You quickly went through all the tutorials of TDD-ing a simple calculator app, instantly grasped the basics and rolled up your sleeves to reimplement your app in the proper way. It rapidly turned out that it’s like a tutorial of drawing an owl:

Source: http://forimpact.org/for-impact-ideas/how-to-draw-an-owl/
You quickly realized that you have no idea how to test your system. What am I supposed to test? I click this button in app and load my data in Activity/View Controller, there is nothing to test really!
Relief - VIPER architecture
Here comes the VIPER architecture — a relief for these problems. It proposes a pretty decoupled design of each scene (let’s say “scene” like that for the simplicity right now), which is a good start for making all your responsibilities delegated. Moreover, decoupling the architecture makes it contain a reasonable amount of seams that allows you TDD your app. Actually, it’s not a completely different approach than a well-known MVP, it’s just a concept of adding some modules to the presenter to delegate its responsibilities which repeatedly appear in all of the mobile application scenes. Let’s dive in!
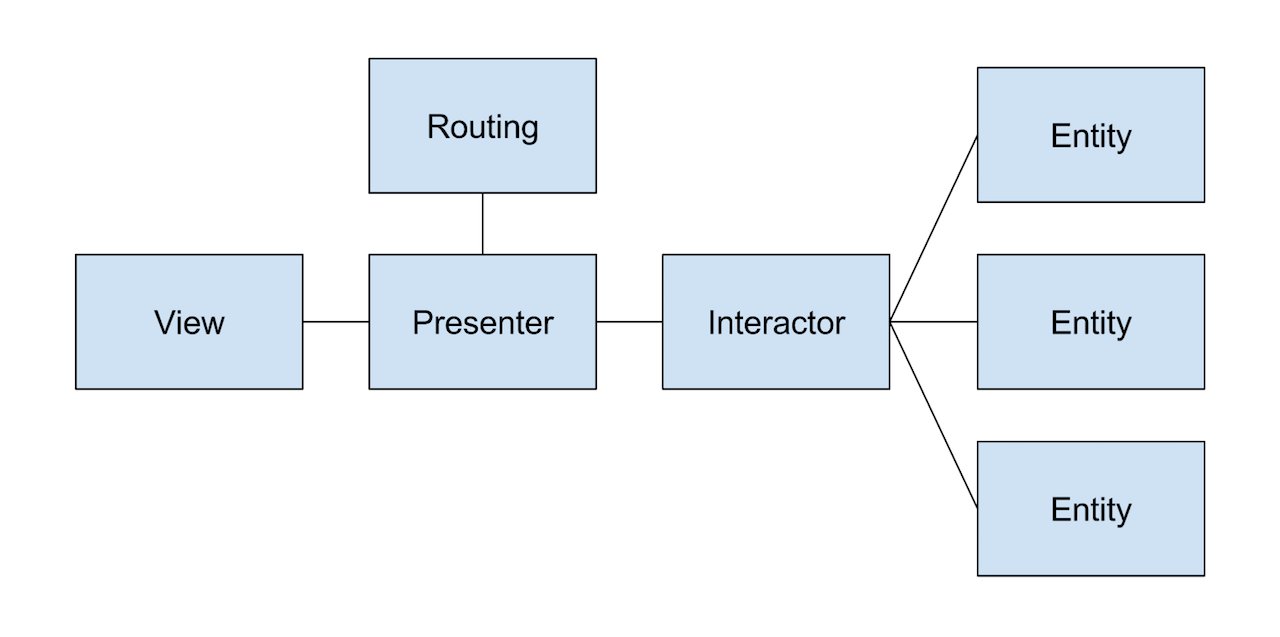
Each VIPER module consists of following sub-modules:
- Contract: defines the way sub-modules communicate,
- View: user interface,
- Presenter: delegating appropriate tasks to Router and Interactor, deciding what and how to display,
- Router/Routing: system framework interactions - mostly app routing (switching views),
- Interactor: data-related business logic,
- Entity (-ies): objects representing your data,
- Builder/Starter: starts a whole VIPER module.
I won’t cover each of them in this post as it’s rather a material for another publication. I will discuss it in the next article, but if you are really curious right now, you can read the original objc VIPER article (I guess). Instead, for now let’s focus on the general features of VIPER.
Main VIPER features
Modularity & interchangeability
It assigns each screen an independent module, so you can move around your project or even your whole projects portfolio. There’s even more: it makes every sub-module independent so you can ie. use VIPER from one project in the another one. You can switch the implementation of only one of sub-modules to meet the requirements of the target application.
Clean code & easy testing
Having all the modules and sub-modules decoupled and independent makes them extremely easy to test. Every sub-module has its own responsibility, so it’s much easier to keep them small, neat and clean throughout whole development process. In addition, unified responsibilities split allows developers to understand the new modules at a glance.
Enhanced agility
What is more, making your app decoupled allows your team to be more agile, especially when circumstances of your project make the specification change frequently, because you can change any of the modules or the sub-modules without even touching the rest of the codebase.
Enterprise acceleration
Moreover, it introduces a huge acceleration to the enterprise mobile development process. It allows the entire team to work on a single screen at once, which leads to an increased frequency of a dev - QA iterations during the sprint. That powerfully eases an agile approach - customer can review screens earlier. It also soothes a dev - QA edge by keeping QA busy on the reasonable level. It’s not like in an „old” approach, where bored QA takes care about other projects at the beginning of a sprint and when a whole bunch of views is ready at the end of a sprint, you have to wait for QA to finish other projects and then you DDoS them using all the views you have developed.
Faster multi-platform development
Furthermore, it makes multi-platform development much easier as Android and iOS can share Contracts, tests, Rx streams and general logic of internals, if you manage to maintain uniform architecture across platforms. In addition, if you write your Android code in Kotlin, you can port the presenter, tests and some utils between platforms with very little effort, as Kotlin and Swift have a very similar grammar. Android and iOS parts of the team can do different modules at once, and after finishing, they can switch and base their coding on already done components of another platform. It also enhances bugs detection as if both platforms share the same logic, if a bug is detected in one platform, it can be fixed on both.
Looking at all the paragraphs above - well, that’s a pretty bunch of advantages!
Doubt
Yes, yes, I can hear you yelling But my view X is so simple, I don’t care about creating six components for that! It’s over-engineering! There’s even nothing to test!. Now think about that app you did last time. You had pretty similar, very simple view X in there, but now it has grown to the enormous size. Have you managed to refactor it? No? Well. Is there something to test right now? And is it tested out? Well… Now you see.
Moreover, I don’t think that having to create some components really is a downside if we can delegate this dirty work to some scripts or plugins like Moviper Templates Generator or Generamba.
Of course, there is also some entry threshold but it usually takes only a few days to feel really confident in this architecture. And the gain of using VIPER grows with every line of code that adds a pinch of a complexity to your codebase. Of course, there is also some boilerplate added to define all the essential sub-modules, but I don’t think that it’s a significant downside in the face of the upsides of this approach.
Sum up
Let’s sum up the upsides of VIPER:
- clean code,
- easy TDD,
- reusable modules and sub-modules,
- easier work distribution,
- instant understanding of modules implemented by other devs,
- sharing logic across platforms,
- enhanced agility.
And check out the downsides as well:
- needs additional work to repeatedly create all the modules [BUSTED],
- some entry threshold [to beat in few days],
- some boilerplate added [but I personally think that it weighs nothing in comparison to all the upsides].
For me it looks like upsides of this architecture weigh much more than downsides, so I think that it’s definitely worth trying to adopt in your workshop.
But wait…
All of the iOS developers are happy now and they’ve just started reading various articles about iOS VIPER implementation, as there are plenty of them. You, iOS fellas, can stop reading right now as you have lots articles to read about that (but remember about the fact that work at open-sourcing Moviper for iOS is in progress ;) ).
On the other hand, Android developers got somehow confused, as searching for the “Android VIPER architecture” gives some appropriate results, but there isn’t even a full page of it. Let’s review what do we have here:
- Lyubomir Ganev series of posts and a related sample,
- Richa Khandelwal post on a Realm blog and a related sample,
- Jiri Helmich presentation and a related sample,
- Dmytro Zaitsev presentation and a library he created,
- and others that I probably couldn’t find.
So, there are already some sources to learn from and it’s great if you liked and wanted to adopt one of these!
Looking in the samples you can see that everyone has its own interpretation of VIPER. As you can see, there isn’t much about VIPER in the Android society and this concept still isn’t monolithic throughout developers, so I feel like there is yet a little bit of a room for me.
Personally, in first two samples I somehow feel the lack of an architecture-enforced Router/Routing (correct me if I’m wrong of course). The following two, unfortunately, have only presentations with not much text that describes their usage which makes it not so easy to start using them. That’s why I decided to publish some articles about general VIPER and Moviper usage and features.
I discovered the aforementioned articles after I have started developing my VIPER library - Moviper - and I perceive the roles of the VIPER components in a slightly different perspective. You can check out Moviper to investigate the differences for now, in later posts I will describe my feeling of this architecture in details.
Stay tuned!
Great thanks to Damian Chodorek and Paweł Gawenda for reviewing this post.

Leave a Comment